글
1) <스케줄러>
Computer Management -> System Tools -> Task Schedule Library -> Microsoft -> Windows -> Application Experience
3. Microsoft Compatibility Appraiser 선택 후 우측 마우스 버튼 클릭. 메뉴에서 Disable (사용 안 함)을 선택
4. ProgramDataUpdater 선택 후 우측 마우스 버튼 클릭. 메뉴에서 Disable (사용 안 함)을 선택
Microsoft Compatibility Appraiser - Collects program telemetry information if opted-in to the Microsoft Customer Experience Improvement Program.
ProgramDataUpdater - Collects program telemetry information if opted-in to the Microsoft Customer Experience Improvement Program
2) <서비스>
Connected User Experiences and Telemetry 사용 안함
dmwappushsvc 서비스 사용 안함
3) 윈도우 10 Peer-to-Peer 윈도우 업데이트 방식 설정 확인
1. Settings (설정) 에서 Update & security (업데이트 및 복구) 선택
2. Update settings 에서 Advanced options (고급 옵션) 선택

3. Choose how updates are delivered (업데이트 제공 방법) 선택

4. Update from more than one place (두 개 이상의 위치에서 업데이트) 항목에서 설정이 Off 인지 확인 아니라면 Off로 설정한다
4) 사진 앱(Photos)과 Runtime Broker CPU 점유율
윈도우 10 Photos app과 Runtime Broker 가 상당히 높은 CPU 점유율을 보인다면 사진 앱(Photos)이 하드디스크 내부의 사진정보를 검색/업데이트하고 있을 것이다.


사진 앱(Photos)을 실행하고 설정(Settings)에서 소스(Sources)에 있는 모든 폴더를 제거한다(그림상에는 이미 폴더가 제거 된 상태) 경로와 폴더명이 있는데 제거하면 된다. Microsoft OneDrive 설정 역시 Off 하고 테스트해본다. 대부분의 경우 CPU 점유율이 내려간다.
5) 새로운 윈도우 10 창 디자인의 기본 설정은 스코롤 막대가 자동으로 숨겨진 상태이다. 디자인 측면에서 보자면 스마트폰 UI와 통일성을 가지려는 이유였겠지만 깔끔함보다 도리어 하단에 다른 정보가 있는지 모르는 경우가 꽤 생긴다. 무엇보다 윈도우 10 앱이 아닌 예전 데스크탑 프로그램의 경우 이게 적용되는 것도 아니기에 사무용 프로그램을 자주 사용하는 데스크탑 사용자에게는 통일성있게 느껴지는 디자인도 아니다. 때문에 스코롤 바가 자동으로 숨겨지는 걸 싫어하는 사용자가 많았는데 윈도우 10 v1803부터는 사용자 취향에 따라 쉽게 설정 할 수 있게 만들었다.
1. Settings(설정) -> Ease of Access(접근성) -> Display(디스플레이)
2. Automatically hide scroll bars in Windows (창에서 자동으로 스코롤 막대 숨기기)
6)
윈도우10 시작메뉴에는 MS 스토어 앱을 권유하는 광고가 나온다. 비활성화 하는 게 좋다.

1. Settings(설정) -> Personalization(개인화) -> Start (시작)
2. "Occasionally show suggestions in Start(때때로 시작 메뉴에 제안 표시)" Off (꺼짐) 설정
3. 사용한 파일이나 기록을 남기고 싶지 않다면 Show recently opened items in Jump Lists on Start or the taskbar(시작 메뉴의 점프 목록 또는 작업 표시줄에 최근에 사용한 항목 표시) 도 Off (꺼짐) 설정.
7)
File Explorer (파일 탐색기) 광고 끄기


MS에서는 제품 서비스에 대한 정보 제공과 알림기능이 목적이라고 했으나 실제로는 광고 용도로 사용하고 있다고 보아도 무방한 행태를 보여주고 있다.
1. View(보기) -> Options(옵션) -> Change folder and search options(폴더 및 검색 옵션)
2. View tab (보기 탭) 에서 “Show sync provider notifications.”(동기화 공급자 알림 표시) 체크 해제 후 적용(Apply)을 누른 후 OK 버튼 클릭.
8) Get Office and Skype 앱 구매 권유 광고 끄기
Settings(설정) -> System(시스템) -> Notifications & actions(알림 및 작업 ) 에서 Get Office 알림을 끄거나 필요가 없을거 같다면 아예 Apps & features 에가서 Get Office, Get Skype앱 자체를 언인스톨(Uninstall)한다.
9)
 The downloadable .reg files below will add and modify the DWORD value in the registry key below.
HKEY_LOCAL_MACHINE\SOFTWARE\Policies\Microsoft\Windows\GameDVR
AllowgameDVR DWORD
(delete) = Enable
0 = Disable
10)
윈도우10 기본앱 삭제 방법 !
사실 용량은 얼마 차지하지 않습니다. 그래도 저는 개인적으로 쓰지 않는 것들이 대부분이라 얼마 안되는 공간들도 아깝더라구요. 그리고 이게 윈도우 업데이트를 할 때 자동으로 같이 업데이트를 해버립니다. 엄청나게 귀찮죠. 그래서 안쓰는 앱들을 다 지워버리기로 마음 먹었습니다.
(사실은 귀찮아서 안하려고 했다가 업데이트 기다리는게 더 귀찮아서 지우는건 비밀)
삭제방법
1. Win키를 누르고 Windows powershell을 입력한다.

위 사진처럼 나오면 오른쪽 버튼을 눌러서 관리자 권한으로 실행을 합니다.
2. powershell에 아래에서 필요한 명령어를 찾아 입력한다.
앱 이름 : 3D 빌더
명령어 : Get-AppxPackage *3dbuilder* | Remove-AppxPackage
앱 이름 : 알람 및 시계
Get-AppxPackage *windowsalarms* | Remove-AppxPackage
앱 이름 : 계산기
Get-AppxPackage *windowscalculator* | Remove-AppxPackage
앱 이름 : 캘린더 & 메일
Get-AppxPackage *windowscommunicationsapps* | Remove-AppxPackage
앱 이름 : 카메라
Get-AppxPackage *windowscamera* | Remove-AppxPackage
앱 이름 : 스카이프
Get-AppxPackage *skypeapp* | Remove-AppxPackage
앱 이름 : Groove Music
Get-AppxPackage *zunemusic* | Remove-AppxPackage
앱 이름 : 지도
Get-AppxPackage *windowsmaps* | Remove-AppxPackage
앱 이름 : 영화 & TV
Get-AppxPackage *zunevideo* | Remove-AppxPackage
앱 이름 : 뉴스
Get-AppxPackage *bingnews* | Remove-AppxPackage
앱 이름 : 원노트
Get-AppxPackage *onenote* | Remove-AppxPackage
앱 이름 : 피플
Get-AppxPackage *people* | Remove-AppxPackage
앱 이름 : 사진
앱 이름 : Get-AppxPackage *photos* | Remove-AppxPackage
앱 이름 : 스토어
Get-AppxPackage *windowsstore* | Remove-AppxPackage
앱 이름 : 스포츠
Get-AppxPackage *bingsports* | Remove-AppxPackage
앱 이름 : 녹음기
Get-AppxPackage *soundrecorder* | Remove-AppxPackage
앱 이름 : 날씨
Get-AppxPackage *bingweather* | Remove-AppxPackage
앱 이름 : Xbox
Get-AppxPackage *xboxapp* | Remove-AppxPackage
11)
How to disable Cortana in Windows 10 Home
As Group Policy Editor is not available in Windows 10 Home unless you install it yourself, we need to use the registry to make the change. Thankfully it's just as straightforward.
- Type 'regedit' into the Windows search. You can use Windows key + R and type 'regedit' if you prefer, both will work.
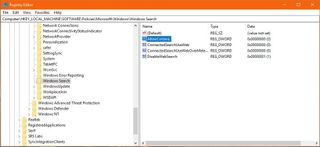
- Navigate to HKEY_LOCAL_MACHINE\SOFTWARE\Policies\Microsoft\Windows\Windows Search in the left pane of regedit.
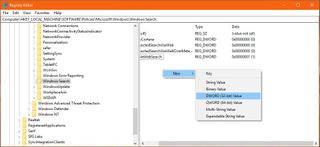
- Right click an empty space in the right pane of regedit and select New and DWORD (32-bit) Value.
- Name it 'AllowCortana' and give it a Value of 0.
- Select OK to save your new key.
12)
불필요한 스케쥴러 끄기
아시는 분들은 아시겠지만 스케쥴러 목록을 보면 정말 많은 스케쥴러가 등록되어 있습니다. 사실 보면 뭐하는 것인지 알수 없는 것이 대부분 입니다. 그걸 다 알고 컨트롤 하기란 힘듭니다. 하지만 아래 것들은 대부분이 마이크로소프트로 정보를 보내는 것들이기 때문에 꺼두어도 윈도우를 사용하는데 아무런 지장이 없으리라 생각 됩니다.
불필요한 스케쥴러를 끄기 위해선 [윈도우키 + S]를 통한 검색에서 "작업 스케쥴러"를 검색하고 실행 시킵니다. 작업 스케쥴러에서 기본 경로는 아래와 같습니다.
작업스케쥴러 > 작업스케쥴러 라이브러리 > Microsoft > Windows
위 경로를 기본으로 하여 아래 설명하는 경로로 이동을 하면 됩니다.
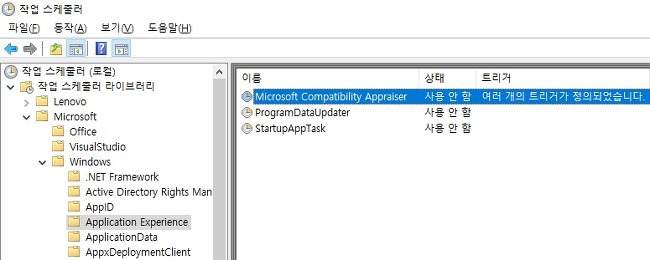
▲ 위 이미지에서 보이는대로 [Application Experience] 로 이동 하여 우측에 보이는 Microsoft Compatibility Appraiser, ProgramDataUpdater, StartupAppTask 세가지 항목을 마우스 우클릭 하여 사용안함을 선택 합니다.
위 세가지 항목은 분석정보를 마이크로소프트로 보내고 시작 항목 알림을 담당 합니다. 윈도우 사용에 크게 필요 한게 아니니 꺼두어도 상관이 없을거 같습니다.
하지만 마지막에 있는 StartupAppTask 항목은 필요 할것 같기도 하지만 저 같은 경우 항상 시작 프로그램 관리를 해주고 있기 때문에 필요 없을거 같아 사용안함으로 설정 했습니다. 만약 시작 프로그램 관리를 안하시는 분들은 그냥 두어도 될거 같습니다.
13)
Enable or Disable Game Mode in Windows 10 Fall Creators Update from Registry
The toggle to control the Game Mode to be “On” or “Off” in the Settings is gone in the Windows 10 Fall Creators Update. But you could enable or disable Game Mode in Windows Fall Creators Update from the Windows registry.
Step 1. Open the Windows registry. Right-click the Start button, then select Run. Type “regedit” and hit Enter.
Step 2. Navigate to the following path:
HKEY_CURRENT_USER\Software\Microsoft\GameBar
Step 3. Locate the key called “AllowAutoGameMode”.
Note: If there’s no this key, create the AllowAutoGameMode key. Right-click inside the right panel, select New>DWORD (32-bit) Value and rename the new value “AllowAutoGameMode”.
Step 4. To enable Game Mode, set the value to 1. To disable Game Mode in Windows 10 Creators Update, change the value to 0.
If you have any opinions about how to enable or disable Game Mode in Windows 10 (Creators Update or Fall Creators Update), please share with us in the comments section below.
14) How to disable taskbar preview thumbnails in Windows 10
Go to the following Registry key:
HKEY_CURRENT_USER\SOFTWARE\Microsoft\Windows\CurrentVersion\Explorer\Taskband
Create a new 32-bit DWORD value named NumThumbnails. Leave its value as 0. Note: If you are running 64-bit Windows 10, you still need to create a 32-bit DWORD value.


RECENT COMMENT